
Home
6 Fall HVAC Maintenance Tips
The HVAC system is the largest consumer of energy in a typical household. They account for 48% of the total energy usage, according to the U.S. Department of Energy.
Fortunately, there are things that you can do to reduce energy costs—regular maintenance being one of them.
Thinking of doing that? Looking for some fall HVAC maintenance tips? If so, you’re at the right place.
We’ll be going over everything that you need to do below. Keep reading to learn more!
Check and Replace the Filters
Make a habit of checking the air filter. Over time, dust and debris can build up and that can clog the system. Not only will that reduce its efficiency, but it can also aggravate allergy and asthma symptoms. For example, it can cause itchy eyes, sneezing, coughing, or headaches.
That’s why it’s recommended that you change the filter once every 90 days (consider keeping an extra replacement filter for your HVAC/furnace at home).
Keep in mind, however, that you may have to replace it more often if you have pets or if you tend to leave the windows open.
For the best results, consider using a high-efficiency pleated air filter; they contain folds that allow them to trap more particles than traditional filters.
Remove Natural Debris From Around the Unit
It’s not uncommon for weeds and other foliage to grow around the unit during the summer. For example, they can build up around the condenser unit. Not only will that disrupt the airflow, but it can also attract bugs and critters, especially as the weather grows colder.
Don’t forget to clean the evaporator and condenser coils as well—they tend to collect dirt over the summer months. Mix some warm water with mild soap in a spray bottle and apply it onto the coils. Give the solution a few minutes to soak in and reapply as needed.
If necessary, you can also use a soft-bristle brush to loosen any dirt or dust.
For more thorough cleaning, you can turn off the unit and unscrew the top grille. Carefully remove the fan and wipe the interior with a damp cloth.
Clean the Vents and Registers
Make sure that all of the registers and vents are clean and clear; they shouldn’t be blocked off by any furniture or rugs. Ideally, there should be at least 10 inches of space around the openings. Push chairs, cabinets, and couches out of the way if you have to.
Generally speaking, the more clearance they have, the better they’ll be able to move air through the home.
And while you’re doing that, take some time to wipe off any dust that might have built up in the area. That’ll prevent them from entering the system and circulating around your home, which can affect the indoor air quality.
Also, you can remove the vent covers and give them a wipe down with a damp cloth.
Reprogram the Thermostat
It’s a good idea to reprogram your thermostat as the days grow cooler. For example, you can lower the temperature when no one is at home. You can also lower it at night if you don’t mind sleeping in a slightly warmer room.
Not only will that save energy, but it’ll save you money as well. In fact, you can save up to 10% a year on heating and cooling costs just by turning your thermostat back 7-10 degrees for eight hours a day.
Tip: There’s no need to crank up the heat for an isolated cold night if you’ve already pre-programmed the thermostat for comfortable temperatures.
Check For Leaks
Check to see if there are any air leaks—they can lead to unnecessary energy consumption and in some cases, can put a strain on your HVAC system.
The easiest way to do this is by placing a damp hand on the edges of windows, air vents, and exterior doors. If there’s a noticeable draft, chances are, there’s a leak.
More often than not, they’re due to deteriorating weather stripping around windows and doors.
You can either replace the weather-stripping altogether or fill in the cracks with caulk. For leaks behind switch plates and outlets, you can install foam gaskets.
And while you’re testing for air leaks, you can also inspect your air ducts insulation for wet spots and damage.
Read Also: WHAT CAN I PUT DOWN MY BATHROOM SINK TO UNBLOCK IT?
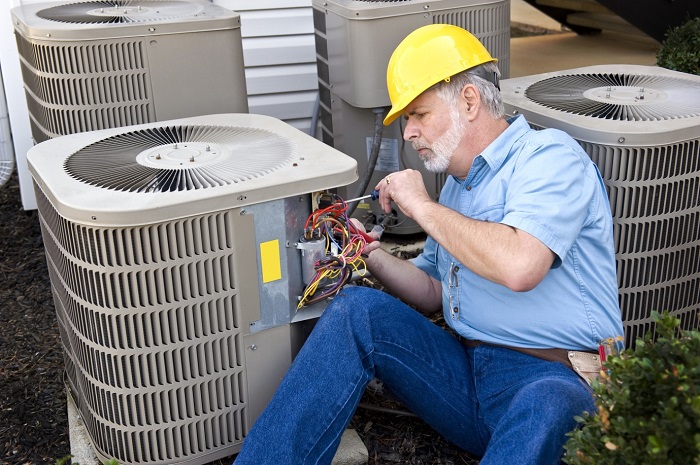
Schedule a Professional Inspection
As a general rule, you want to schedule an inspection at least once a year. Aside from checking the filters, they’ll also inspect the belts, motors, electrical switches, contacts, and refrigerant levels—basically all of the system’s components.
Chances are, they’ll clean the air ducts as well, which will help to prevent clogs.
As far as pricing goes, it usually ranges from $100 to $200. At the end of the day, it depends on various factors such as the cost of living in your area, time of day, and age of your HVAC unit (older models will generally need more repairs than newer models and that will be reflected in the price).
The Importance of Fall HVAC Maintenance
And there you have it—a fall HVAC maintenance checklist. As you can see, there are various things that you want to do to prepare your unit for the cooler weather, from checking the filters to scheduling a professional inspection.
Looking for more tips like this? If so, be sure to check out some of the other posts in our home section!


![[pii_email_4c910535350b5a41ee81] Error Code Resolved](https://wigily.com/wp-content/uploads/2020/09/pii_email_4c910535350b5a41ee81-Error-Code-Resolved.jpg)